Live streaming is very popular today. Many people stream on platforms like YouTube, Twitch, and Facebook. But not everyone has time to watch long live streams. That is why highlight reels are important. A highlight reel is a short video that shows the best moments of a live stream. These videos help you get more views, keep your audience engaged, and share your best content quickly.
Creating highlight reels may seem difficult, but with the right tools, it becomes easy. In this blog post, we will show you how to turn your live streams into short, engaging highlight reels using CapCut Desktop Video Editor. We will also discuss how to add AI-generated voiceovers using CapCut’s text-to-speech feature.
Let’s get started.
Picking the Best Moments for Your Highlight Reel
The first step in creating a highlight reel is choosing the best moments from your live stream. Not everything in a live stream is exciting, so you need to pick only the most interesting parts. Here’s how to do it:
How to Choose the Best Moments
- Look for exciting parts – These can be funny reactions, epic wins (for gamers), emotional moments, or important messages.
- Check audience reactions – If people reacted strongly in the chat or left many comments, that part is worth including.
- Use timestamps – While streaming, note down the times when something interesting happens. This makes editing easier later.
- Keep it short and engaging – A highlight reel should be between 30 seconds to 3 minutes long to keep viewers interested.
Editing Your Highlights with CapCut Desktop
Now that you have chosen the best moments, it is time to edit them into a highlight reel using one of the most popular video editing software, CapCut Desktop Video Editor.
Steps to Edit Your Video in CapCut
- Download & Open CapCut – If you do not have it, download CapCut Desktop from the official website. Open the software and start a new project.
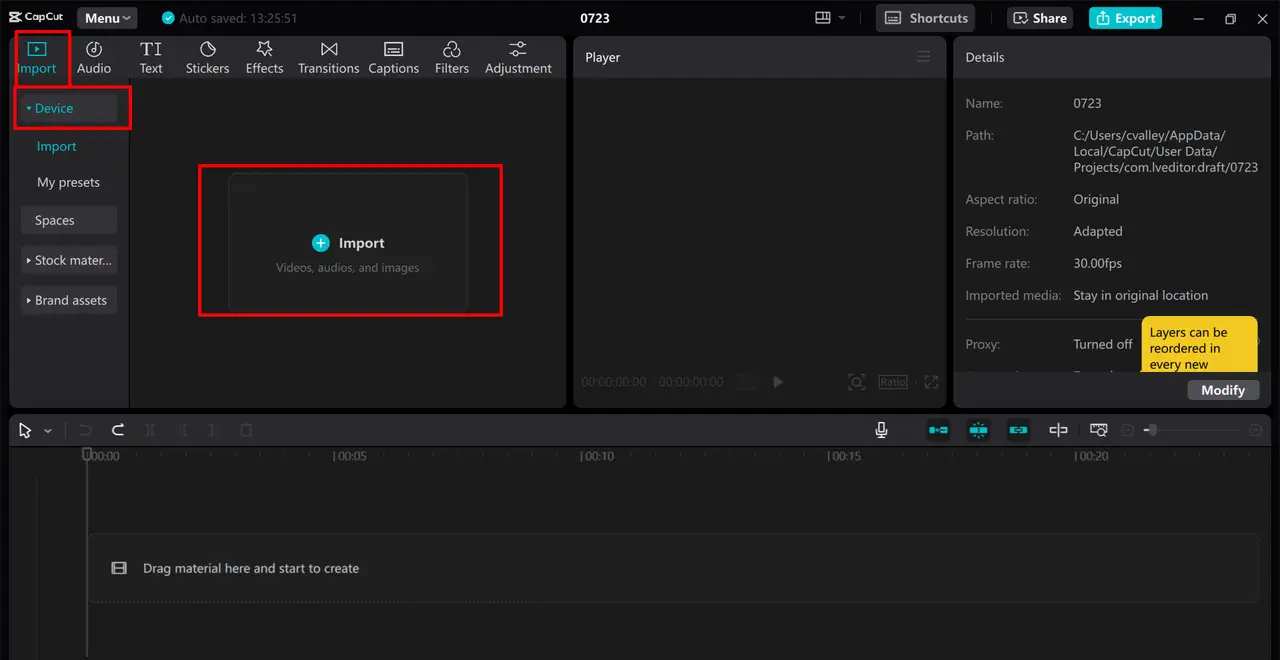
- Import Your Video – Click the “Import” button and add your live stream footage. Drag it to the timeline at the bottom.
- Cut Unwanted Parts – Use the split tool (scissors icon) to remove boring or unnecessary parts. Keep only the best moments.
- Add Smooth Transitions – Click on “Transitions” and choose effects like fade-in, fade-out, or zoom for a smooth flow.
- Enhance with Filters & Effects – Add filters or effects to make your video more eye-catching.
- Add Background Music – Choose a song or sound effect from CapCut’s built-in library to make your highlight reel more engaging.
Using AI to Improve Your Highlight Reel
AI tools make video editing easier and faster. One powerful feature of CapCut is Text-to-Speech. This feature lets you convert text to voice without needing to record your own voice.
Why Use AI Voiceovers in Highlight Reels?
- Saves time – You do not need to record your own voice.
- Professional sound – AI-generated voices sound clear and smooth.
- Great for accessibility – Helps viewers who prefer listening to text.
How to Add AI-Generated Voiceovers in CapCut
If you want to add a voiceover without recording yourself, you can use CapCut’s Text-to-Speech feature. Here’s how:
Step 1: Import Your Video
Open CapCut Desktop Video Editor. Click “Import” and add your edited video. Drag the video to the timeline.
Step 2: Convert Text to Voice
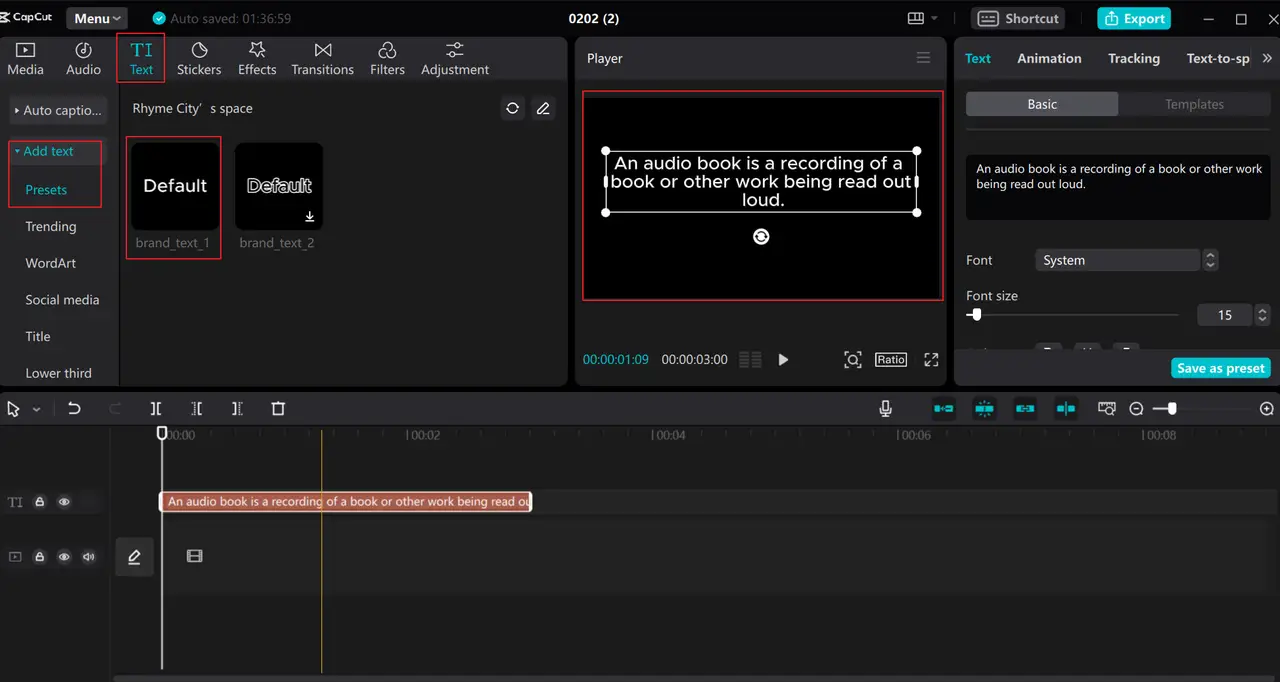
Click on “Text” in the toolbar. Type the words you want to be spoken. This can be a short explanation, a funny comment, or a summary. Click “Text-to-Speech” and choose a voice from the available options (male, female, robotic, etc.). Adjust the speed and pitch if needed.
Step 3: Export Your Video
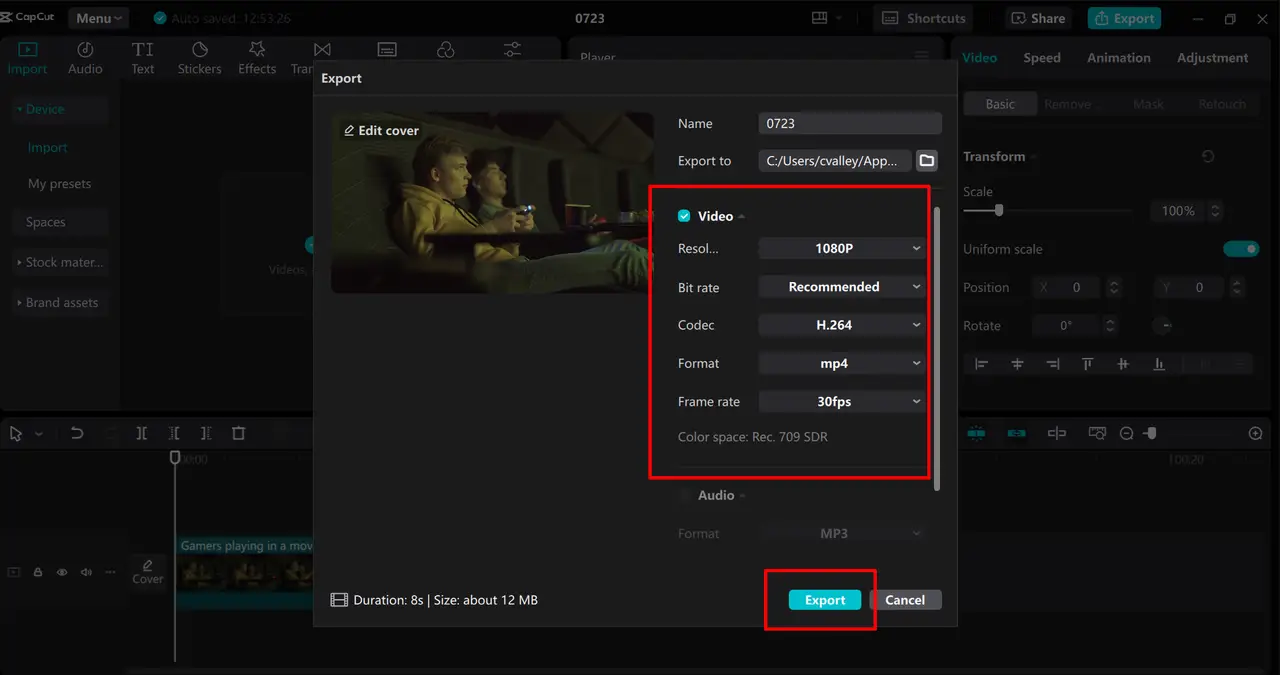
Click “Preview” to check your video. If everything looks good, click “Export”. Choose the resolution and save your final highlight reel.
Now, your video has a professional AI-generated voiceover. Moreover, you can also use an AI video generator to add some more imaginary scenes to your videos.
Adding Final Touches to Your Highlight Reel
Before sharing your video, add the final touches to make it more polished. Here are some things you can do:
Add Subtitles
- Many people watch videos without sound. Adding subtitles makes your video more engaging.
- CapCut has an Auto-Captions feature that generates subtitles automatically.
Adjust Video Speed
- Speed up boring parts and slow down exciting moments for more impact.
- Use CapCut’s speed adjustment tool to do this.
Add Stickers and Emojis
- If you want to make your video funnier, add stickers or emojis to highlight reactions.
Where to Upload Your Highlight Reel?
- YouTube Shorts – Great for short and engaging highlights.
- TikTok – Perfect for viral moments.
- Instagram Reels – Good for reaching a wider audience.
- Facebook & Twitter – Share with your followers for more engagement.
Conclusion
Creating highlight reels from live streams is an easy and effective way to grow your audience. With CapCut Desktop Video Editor, you can quickly edit your videos, add AI-generated voiceovers, and create professional-looking highlight reels.
Here’s a quick recap of what we covered:
- Pick the best moments from your livestream.
- Edit and trim using CapCut.
- Use AI voiceovers for narration.
- Add effects, transitions, and subtitles.
- Export and share your highlight reel online.
Now it is your turn. Try creating your own highlight reel using CapCut and let us know how it goes.
